Designing a book cover is the sort of project every designer loves getting the chance to work on. It can be an elusive kind of job though, and so often when the opportunity arises a new designer may be a little unsure of the best way to proceed. If you are uncertain of how to begin, here are a couple of simple starting points to setup your document, and show you that it’s really not hard.
The basics — binding and page count
For now, we’re just going to look at setting up a paperback book cover. In particular, a perfect or burst bound book with at least approximately 72 or more pages. Why this format and page count? Well, realistically, most paperbacks are either perfect bound (collections of signatures glued into the cover) or burst bound (loose pages glued into the cover. If you have a choice, always opt for perfect bound; burst bound is the type of binding that usually results in pages falling out if you, you know, ever actually read the book). And if you have fewer than 72 pages, you most likely don’t need to worry about a spine on your cover, as the book can probably just be saddle-stitched (ie stapled), and so the process of setting up a cover like that is really no more complex than just setting up an ordinary page inside the book itself.
The spine
If you haven’t created a book cover before, something that can catch you by surprise is the spine of the book. Specifically, exactly how thick is it supposed to be? This you quickly learn by experience: you need to get this measurement from your printer. It typically forms part of the quote/job setup, and if your print rep doesn’t supply it, you might have to remind them that you need it.
The printer works this width out from metrics they have for the different paper stocks they use, along with the necessary number of signatures (bundled groups of pages) for the job etc. You can make an educated guess from examining books with a similar number of pages, and you may need to do this in order to put a cover design together before the printer becomes involved, but make sure that your final press-ready cover is correct to the measurements your printer has supplied.
The multi-page approach
This is my preferred method of assembling a paperback cover, because like I just mentioned you often need to put your cover together before you actually have the final spine dimensions from the printer. With that in mind, an approach to assembly that saves time when you later need to make adjustments to your cover dimensions is preferable.
Document setup

Create three pages at the same dimensions as the interior pages of your book. Set your margins to zero (will explain why later), turn facing pages off and remember to add bleed.
Arrange your pages
Open up the pages panel (‘Window>Pages’ or press CMD/Ctrl+F12). You should have three pages one after another. These are going to become the back cover, the spine and the front cover, respectively.

Right-click/Ctrl-click on any page and uncheck ‘Allow document pages to shuffle’. This is a global setting for your document. Normally you’d keep this checked (which is why it’s checked by default) so that you can easily drag pages manually around in the panel, and all your other pages will reflow correctly, switching right to left etc. We don’t want pages to reflow at all in this document.

With that in mind, Right/Ctrl-click each page in turn and also uncheck ‘Allow selected spread to shuffle’. This setting is specific to each spread in the document, so it needs to be turned off for every page.
You can now rearrange pages any way you like, and InDesign won’t try to outsmart you and move them into what it considers a normal sequence. Enjoy your newfound freedom and drag all three pages into a line, as shown.


Pay attention to the direction arrow that pops up next to your cursor to see where the page will fall. It’s not really a big deal, since all the pages are still identical at this point — you just need to end up with three pages in a line — but it’s still beneficial to understand the behaviour of the panel.

Resize the spine
Switch to the Page tool (SHIFT+P) and select the middle page out of the three.

On the toolbar, near the top left of the screen, you can see the dimensions of the currently selected page. In the ‘Width’ field, enter the value of your spine width and hit return.
This step is the reason why you set the page margins to zero when first creating your document. If the page margins were still at their default value, or any amount greater than half of the spine width you just entered, then this step will fail with an error message, letting you know that InDesign cannot resize a page to be smaller than its total margin width or height. Setting margins to zero just avoids this. If you want the margin guides for working on your cover design, then they can be adjusted from the ‘Layout>Margins and Columns’ menu to be whatever value you like.

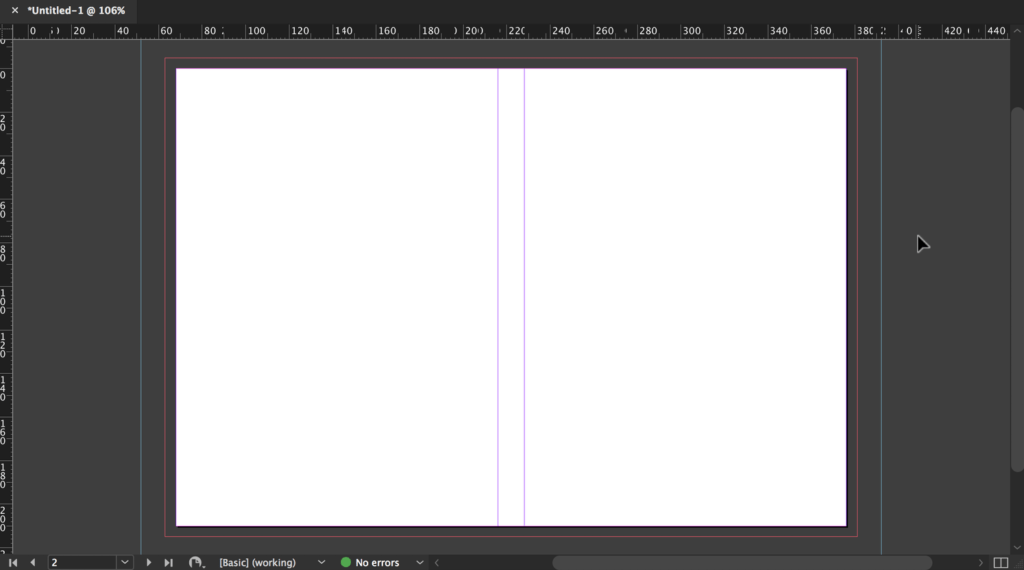
Your middle page should now be a narrow strip floating between the other two pages. Drag it left, holding down the shift key to constrain it to a 90º angle, until it snaps to the edge of the back cover page. Then also shift+drag the cover page left until it snaps to the spine edge.

You should now have three pages (wide, narrow, wide) sitting edge-to-edge on the pasteboard, with your cover panels and spine all at their correct sizes, and ready for you to begin your design.
Updating
If you need to change your spine width later for any reason, you only need to return to the Pages tool, select the middle page again, and enter a new value for the spine width. You can combine these adjustments with InDesign’s Liquid Layout settings, if you want to, and have content auto-adjust to the new dimensions as well.
Changing width may cause a small gap or overlap between pages, so be mindful of that and move the pages left/right as necessary until the edges snap together again.
Exporting
Since your cover is actually comprised of three separate pages, and you need them to all be on one single page for printing, you need to always remember to make one essential change to your PDF export settings whenever you output your cover.

You need to change from ‘Pages’ to ‘Spreads’ in the PDF export settings. Ordinarily this is absolutely not something that you want to do when creating a PDF for press use, but owing to the unique setup of this document it is essential here. Otherwise you’ll end up with a PDF containing three, different-sized, pages. Your printer will not be impressed. Output with spreads turned on and what you will be left with is a PDF with one page containing your cover, ready to print.
The single-page approach
This is a simpler, more straightforward method where you will setup your cover as a single page document, and use guides to ensure the position of your spine is correct. It’s a good idea to use this method if you need to archive work in an organisation, or potentially share it with other designers without being able to give an explanation as to the setup method – simple is better in these sort of circumstances.
Document setup
It’s always easier, and much safer, to let computers carry out any calculations for you. Since you’re going to be setting up a document that is twice the width of your book’s page size, plus the spine width (which you get from your printer, remember) just start by creating a new document that is the same dimensions as your book. A paperback cover doesn’t need to be any bigger or fancier than that (just remember to add bleed).

Adjust page size
Switch to the Pages tool (SHIFT+P) and have a look up near the top left corner of your screen. In the toolbar you should see fields for the width and height of your document. Now, one of the nice things InDesign can do for us is: mathematics. You can do addition, subtraction multiplication etc in any numeric field in the program. This saves us having to figure out measurements.
So, in the width field simply add *2 after the number and hit enter. InDesign will double the width of your page (an asterisk * works as multiplication sign).

Now put a plus (+) after the new number and enter the width of your spine into the field.

After you hit enter again InDesign will resize your document once more, and you will now have a page which is exactly twice the width of your interior pages, plus the width of your spine.
Setup guides
Now you need some sort of template to allow you to design with everything in the correct place. It’s essential that the spine is exactly centred so once again we’re just going to let the program work things out for us.
Go to ‘Layout>Margins and Columns’.

In the dialog box, uncheck ‘Enable Layout Adjustment’ and change the ‘Number’ value in the ‘Columns’ section to ‘2’. This will split your back and front cover panels.
You can enter whatever value you like for your Margins, or just leave the defaults in place.
Finally, in the ‘Gutter’ value in the ‘Columns’ section, enter your book’s spine width, along with the unit of measurement, and click ‘OK’.

The magenta margin and column guides should now show two large panels, marking out your front and back cover, and a narrow gutter between them, which will be the width of your book’s spine, perfectly centred. Design for your back cover goes on the left, and the front cover goes on the right.


Leave a Reply
You must be logged in to post a comment.